Listをデフォルト表示からカスタマイズする方法を解説します。
環境
この記事の情報は次のバージョンで動作確認しています。
【Swift】5.5.2
【iOS】15.2
【macOS】Monterey バージョン 12.2.1
セパレータ表示可否の指定
|
1 2 3 4 5 |
.listRowSeparator(visibility, edges: VerticalEdge) .listSectionSeparator(visibility, edges: VerticalEdge) |
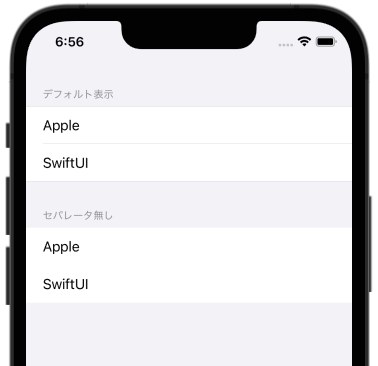
セパレータの表示可否を行単位またはセクション単位に指定します。
セパレータの無いリストスタイル(.sidebar等)が指定されている場合、このモディファイアは影響しません。
【引数】
visibility
セパレータの表示可否を指定します。
指定できるのは、.visible(表示)、.hidden(非表示)、.automatic(自動)のいずれかです。
edges(省略可)
対象となる辺を、.top(上端)、.bottom(下端)、.all(全て)で指定します。
省略した場合のデフォルト値は .all です。
使用例
|
1 2 3 4 5 6 7 8 9 10 11 12 13 14 15 16 17 18 19 20 21 22 23 24 |
struct ContentView: View { var body: some View { List { Section { Text("Apple") Text("SwiftUI") } header: { Text("デフォルト表示") } Section { Text("Apple") .listRowSeparator(.hidden) Text("SwiftUI") } header: { Text("セパレータ無し") } .listSectionSeparator(.hidden) } .listStyle(.grouped) } } |
セパレータの色指定
|
1 2 3 4 5 |
.listRowSeparatorTint(color, edges: VerticalEdge) .listSectionsSeparatorTint(color, edges: VerticalEdge) |
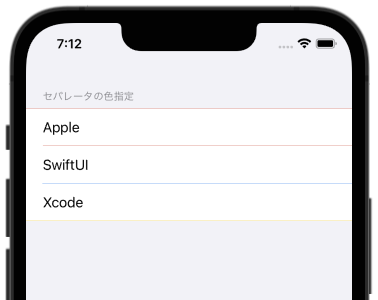
セパレータの色を行単位またはセクション単位に指定します。
セパレータの無いリストスタイル(.listStyle)が指定されている場合、このモディファイアは影響しません。
【引数】
color
セパレータの色をColor構造体で指定します。
デフォルト色とする場合はnilを指定します。
edges(省略可)
対象となる辺を、.top(上端)、.bottom(下端)、.all(全て)で指定します。
省略した場合のデフォルト値は .all です。
使用例
|
1 2 3 4 5 6 7 8 9 10 11 12 13 14 15 16 17 |
struct ContentView: View { var body: some View { List { Section { Text("Apple").listRowSeparatorTint(Color.red) Text("SwiftUI").listRowSeparatorTint(Color.blue) Text("Xcode") } header: { Text("セパレータの色指定") } .listSectionSeparatorTint(Color.yellow) } .listStyle(.grouped) } } |
行背景の指定
|
1 2 3 |
.listRowBackground(view) |
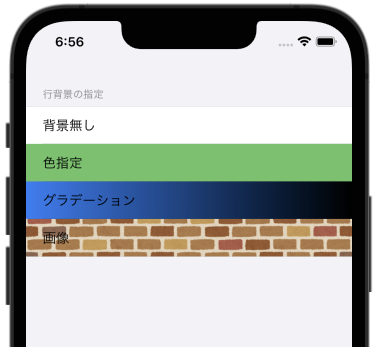
行の背後にカスタム背景ビューを配置します。
【引数】
view
行の背後に背景として使用するビューを指定します。
使用例
背景には任意のViewが指定可能です。
画像(Image)を使う場合は、下記例のようにフレームサイズを指定します。
|
1 2 3 4 5 6 7 8 9 10 11 12 13 14 15 16 17 18 19 20 21 22 23 24 25 26 27 28 29 30 31 |
struct ContentView: View { var body: some View { List { Section { Text("背景無し") Text("色指定") .listRowBackground(Color.green) Text("グラデーション") .listRowBackground(LinearGradient(gradient: Gradient(colors: [.blue, .black]), startPoint: .leading, endPoint: .trailing)) Text("画像") .listRowBackground( GeometryReader { geometry in Image("renga_pattern") .resizable() .scaledToFill() .frame(width: geometry.size.width, height: geometry.size.height ) .clipped() } ) } header: { Text("行背景の指定") } } .listStyle(.grouped) } } |
行余白の指定
|
1 2 3 4 5 6 7 8 |
.listRowInsets(EdgeInsets( top: CGFloat, // 上辺の余白幅 leading: CGFloat, // 左辺の余白幅 bottom: CGFloat, // 下辺の余白幅 trailing: CGFloat // 右辺の余白幅 )) |
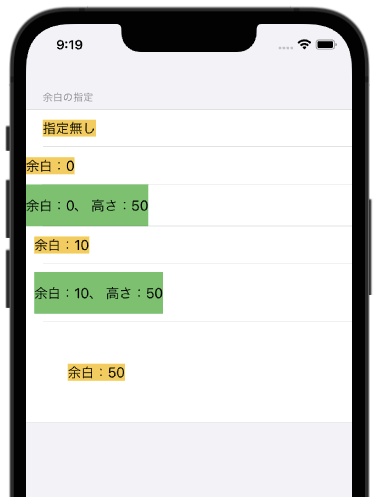
リスト行の各辺の余白を設定します。一部省略はできません。
使用例
余白がわかりやすいように、各行のテキストに背景色をつけています。
余白指定無しの場合、デフォルトの余白が適用されます。
行の高さの最小値が決まっており、いくら余白を小さくしてもそれよりは小さくはなりません。
|
1 2 3 4 5 6 7 8 9 10 11 12 13 14 15 16 17 18 19 20 21 22 23 24 25 26 27 28 29 30 31 32 |
struct ContentView: View { var body: some View { List { Section { Text("指定無し") .background(Color.yellow) Text("余白:0") .background(Color.yellow) .listRowInsets(EdgeInsets(top: 0, leading: 0, bottom: 0, trailing: 0)) Text("余白:0、 高さ:50") .frame(height: 50) .background(Color.green) .listRowInsets(EdgeInsets(top: 0, leading: 0, bottom: 0, trailing: 0)) Text("余白:10") .background(Color.yellow) .listRowInsets(EdgeInsets(top: 10, leading: 10, bottom: 10, trailing: 10)) Text("余白:10、 高さ:50") .frame(height: 50) .background(Color.green) .listRowInsets(EdgeInsets(top: 10, leading: 10, bottom: 10, trailing: 10)) Text("余白:50") .background(Color.yellow) .listRowInsets(EdgeInsets(top: 50, leading: 50, bottom: 50, trailing: 50)) } header: { Text("余白の指定") } } .listStyle(.grouped) } } |
あわせて読みたい記事


