Listでタップ処理の実装方法を解説します。
環境
この記事の情報は次のバージョンで動作確認しています。
【Xcode】12.5RC
【Swift】5.4
【iOS】14.5
【macOS】Big Sur バージョン 11.1
【Swift】5.4
【iOS】14.5
【macOS】Big Sur バージョン 11.1
基本的なタップ処理
Listでタップ処理を実現するには、.onTapGesture()モディファイアを使用します。
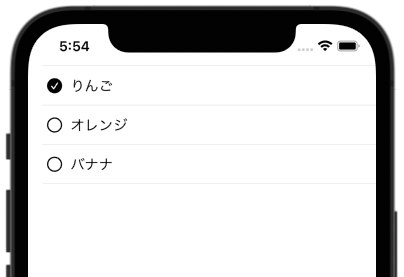
次のコードは基本的な使用例です。
フルーツ名をタップするとチェックボックスのON/OFFが切り替わります。
|
1 2 3 4 5 6 7 8 9 10 11 12 13 14 15 16 17 18 19 20 21 22 23 24 25 26 27 28 29 30 31 32 33 34 35 36 37 38 |
import SwiftUI struct Fruit { var checked: Bool var kind: String init(_ kind: String) { self.checked = false self.kind = kind } } struct ContentView: View { @State var fruits: [Fruit] = [ Fruit("りんご"), Fruit("オレンジ"), Fruit("バナナ") ] var body: some View { List { ForEach(0..<fruits.count) { index in /// セルの表示 HStack { Image(systemName: fruits[index].checked ? "checkmark.circle.fill" : "circle") Text("\(fruits[index].kind)") } /// checkedフラグを変更する .onTapGesture { fruits[index].checked.toggle() } } } } } |
セル全体をタップ領域にする
先程の例では、文字列部分のみがタップ領域となっており、右側の空白部分はタップできません。
セル全体をタップ領域にするには次の2行を追加します。
.contentShape()はタップ領域の形状を指定するモディファイアです。
|
1 2 3 4 5 6 7 8 9 10 11 12 13 14 15 16 17 18 19 20 |
var body: some View { List { ForEach(0..<fruits.count) { index in /// セルの表示 HStack { Image(systemName: fruits[index].checked ? "checkmark.circle.fill" : "circle") Text("\(fruits[index].kind)") Spacer() // 追加 } /// checkedフラグを変更する .contentShape(Rectangle()) // 追加 .onTapGesture { fruits[index].checked.toggle() } } } } |
ListとButton
ListとButtonは相性がよくありません。
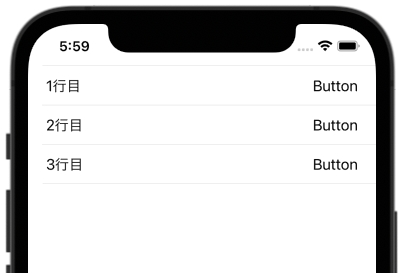
例えば、次のコードを実行すると、セルのどこをタップしてもButtonのactionが発動してしまいます。
|
1 2 3 4 5 6 7 8 9 10 11 12 13 14 15 16 17 18 19 |
import SwiftUI struct ContentView: View { var body: some View { List { ForEach(1..<4) { index in HStack { Text("\(index)行目") Spacer() Button("Button") { print("\(index)行目のButtonをタップ") } } } } } } |
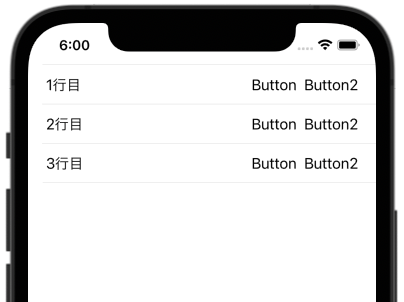
また、次のようにButtonを2つ並べると、セルのタップで両方のactionが発動してしまいます。
|
1 2 3 4 5 6 7 8 9 10 11 12 13 14 15 16 17 18 19 20 21 22 |
import SwiftUI struct ContentView: View { var body: some View { List { ForEach(1..<4) { index in HStack { Text("\(index)行目") Spacer() Button("Button") { print("\(index)行目のButtonをタップ") } Button("Button2") { print("\(index)行目のButton2をタップ") } } } } } } |
解決策
Buttonの代わりに.onTapGestureを使うと個々のタップ検知が可能になります。
|
1 2 3 4 5 6 7 8 9 10 11 12 13 14 15 16 17 18 19 20 21 22 23 24 |
import SwiftUI struct ContentView: View { var body: some View { List { ForEach(1..<4) { index in HStack { Text("\(index)行目") Spacer() Text("Button") .onTapGesture { print("\(index)行目のButtonをタップ") } Text("Button2") .onTapGesture { print("\(index)行目のButton2をタップ") } } } } } } |
あわせて読みたい記事

【SwiftUI】Listの使い方
(2022/03/09 更新) Listはデータの一覧表示をするのに適したViewです。 画面に収まらない量の場合はスクロール表示になるなど、UIKitのUITableViewに似ていますが、はるかに簡単に使えます。 ListはForEac...

【SwiftUI】Buttonの使い方
(2021/10/19 更新) ラベルとアクションを持つButtonの使い方を解説します。


